AUDIO ENGINEERING ISSUE: FINDING THE RIGHT MIC SETTINGS
What sounds good? is a tough question for audio and podcast engineers to answer, as audio quality is always subject to sonic sensibilities and variations of the human ear, differences in playback technologies (e.g., reference monitors, mobile devices, computer speakers, car speakers, etc.), and differences in types of sounds (e.g., music or voice).
An easier question to answer is always, What “sounds better? Of course, the same variables as above apply, but at least in an A/B situation we can avoid the subjectivity and focus on variables more objectively, as in, sample A has more bass than sample B. Sample A is much louder than sample B. Sample A sounds as clear as sample B. There seems to be no difference between sample A and B.
In this example, podcast producer Patrick Moran is trying to get a “good sound” from his podcasting mic set up, and he asks the question, which microphone settings sound better? He writes,
I have attached here a little clip of me sound testing with 2 mic settings. I’m pulling what little hair I have left out going back and forth over which setting I can use. I’d be extremely grateful if you could give it a listen and then tell me if you prefer the sound of Mic 1 or Mic 2. Any feedback would be appreciated to but hopefully this will get me to pick one and stick to it. Thanks! (No mention in recording of my mic, podcast, name or anything else that be interpreted as a plug)
TSVP audio engineers took a look and listen to Mr. Moran’s sound issue and did a very quick evaluation, applied some dynamic processing we typically find most helpful in podcasting, and then we make an assessment of the issue.
PROCESSING
We do not have the original audio by which we can compare Mic 1 or Mic 2, so we simply start from the premise that a certain effects protocol or chain was applied to Mic 1 and a different protocol was applied to Mic 2. These are what we call our “original” samples. Based on what we hear, this is what we did:
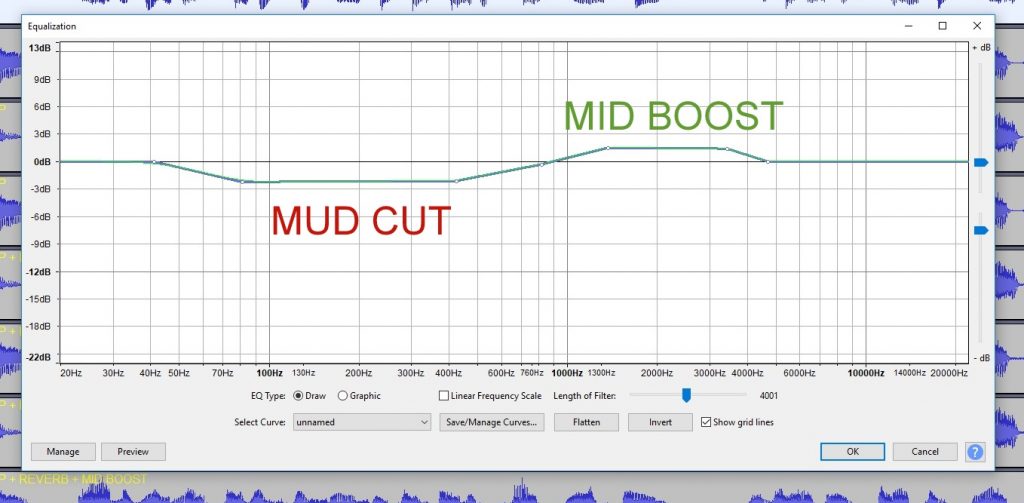
- Mud Cut: We cut a wide range of upper low & lower mid freqs to gain more clarity.
- Because the voice still sounded dull and boxy (we suspect probably in part from too much noise gating and/or NR as visually evident in inter-voice sections of the wave form below), we applied some reverb to give the voice less of a dead studio quality.

- We boosted mid range slightly to add a little more punch to the typical male formant freqs range for more vocal clarity and punch.
- These audio samples could benefit from more than one application of the above effects, but we erred on the lighter side here.
SOUND SAMPLES
SETTING A (“MIC 1”)
ORIGINAL
- SPECS: mono, RMS = -17.42dB, loudness = -17.7dB
MUD SCOOP
- SPECS: mono, RMS = -17.42dB, loudness = -17.5dB
MUD SCOOP + REVERB: mono
- SPECS: RMS = -17.42dB, loudness = -17.5dB
MUD SCOOP + REVERB + MID BOOST
- SPECS: mono, RMS = -17.42dB, loudness = -17.2dB
SETTING B (“MIC 2”)
ORIGINAL
- SPECS: mono, RMS = -17.42dB, loudness = -17.6dB
MUD SCOOP
- SPECS: mono, RMS = -17.42dB, loudness = -17.4dB
MUD SCOOP + REVERB:
- SPECS: mono, RMS = -17.42dB, loudness = -17.4dB
MUD SCOOP + REVERB + MID BOOST
- SPECS: mono, RMS = -17.42dB, loudness = -17.4dB
ASSESSMENT
- Of the original samples, we think Mic 1 is natively clearer and less muddy than Mic 2. So, from the start we preferred it over Mic 2.
- As we applied processing, we believe that we noticeably improved both samples, but Mic 1 remained the “better” track.
- As stated above, this A/B project is based on the premise that the original samples had been previously processed (we don’t know how or to what degree), so whatever we did here can only be evaluated within that context. In other words, we don’t know how we have been compensating for (or working against) processing might have been unnecessarily applied to the original audio. Without the original raw audio, we just don’t know the extent we improved or diminished the native audio.
- We don’t claim to have “improved” the audio samples here to anyone’s satisfaction but our own.
RECOMMENDATION
In our experience, we find that a wide range of sonic and technical variables always affect recording situations differently (e.g., different room acoustics, mic choices, different voice tones and timbre, coloration from pre-amps and dynamic processing, etc.). To get that “good sound” we strive for consistently, we always have to adjust and adapt to these variables. Therefore, there is never going to be one standard EQ curve to fit a microphone. Nor will there be a standard effects chain or protocol that can be applied to every and all situations.
The key to getting the best sound out of a microphone can be summed up in one principle: Let your mic do its thing. But wait, there’s more!:
- Know your mic. Engineers should know and understand their microphones’ technical specs, such as their built-in EQ curves. If your mic as a high-mid boost like the Electro-Voice RE320, expect your native audio to effected by that. If your mic has a built-in roll off or boost switches, understand these frequencies.
- Understand how sound works. Pay attention to how mics perform with different voices, room tones, or sound sources that might affect audio quality. Mic placement (e.g., high on the face or low on the throat) can affect sonic quality, as does bass proximity effect from close talking.
- Always listen first. Instead of creating a one-size-fit-all effects template that’s applied automatically to audio (akin to automatically reaching for the salt and pepper before you’ve tasted your meal), develop a “general sense” understanding of what effects to apply to microphone tracks. Bottom line: Listen first, then apply only the effects needed.
- Trust your ears. We always record in the field as flat and consistently as possible. Only while working in post in your DAW, listening with good desk or headphone monitor speakers (e.g., flat EQ response) can you truly know where to take your audio processing so that you get that “good sound” you’re looking for.
You must be logged in to post a comment.